Linux部署ERP系统
官方文档:http://doc.jeecg.com/2043886
前端部署
1.下载安装CentOS7 https://zhuanlan.zhihu.com/p/60408219
2.VirtualBox安装完CentOS后网络改成桥接模式,然后使用FinalShell链接
3.前端.env修改成生产pro环境,.env.production的ip修改成虚拟机ip
4.编译前端
# 下载依赖
 yarn install
# 编译项目
 yarn run build
5.把前端的dist文件夹中的内容上传到Nginx的html目录中 /usr/share/nginx/html
8.关闭系统防火墙
# 查看防火墙状态 systemctl status firewalld.service    ---“active(running)”,说明防火墙是开启状态
# 停止防火墙 systemctl stop firewalld.service
# 启动防火墙 systemctl start firewalld
# 永久关闭防火墙 systemctl disable firewalld.service
后端部署
1.安装mysql,把sql文件导入
#登录数据库 mysql -uroot -p
#创建数据库 create database psi;
#切换数据库并且设置编码  use psi; set names utf8;
#导入sql source /www/wwwroot/psi-master/db/psi-mysql-5.7-1.sql
         source /www/wwwroot/psi-master/db/psi-mysql-5.7-2.sql
#查看一下是否成功 SHOW TABLES;
#退出 exit;

如果导入psi-mysql-5.7-2.sql 报错的话
解决方法:
在 MySQL 中创建函数时出现这种错误的解决方法:
在 MySQL 数据库中执行以下语句,临时生效,重启后失效
set global log_bin_trust_function_creators=TRUE;
2.修改配置文件 application-prod.yml,修改 数据库连接、缓存redis、上传附件等配置(数据库和redis的ip都是本地ip,默认不改)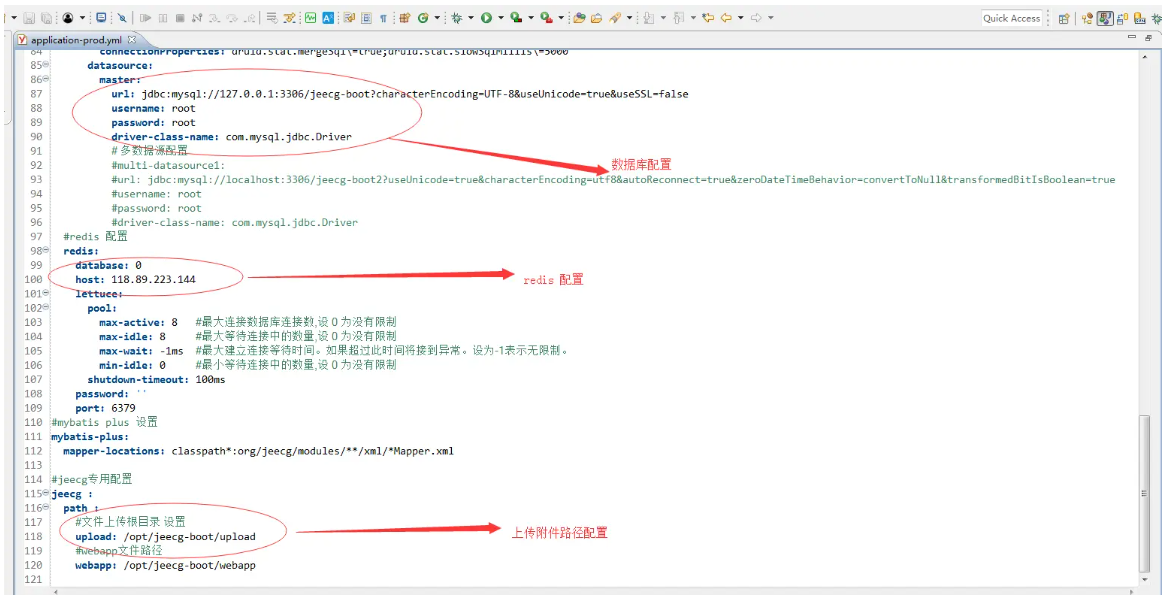
3.切换Maven为生产模式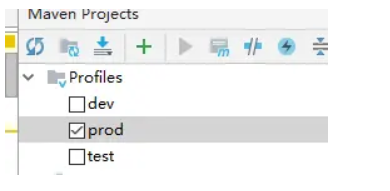
4.通过jeecg-boot-parent打包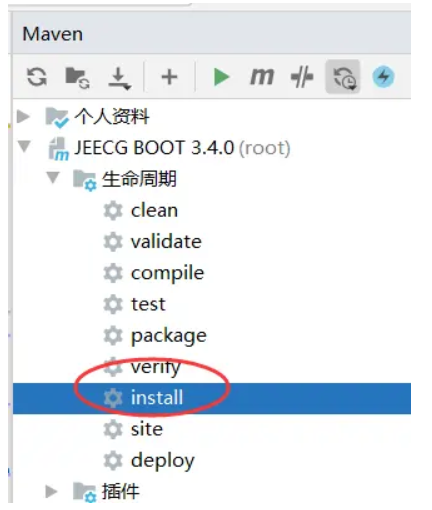
5.拿到 jeecg-system-start-{版本号}.jar 包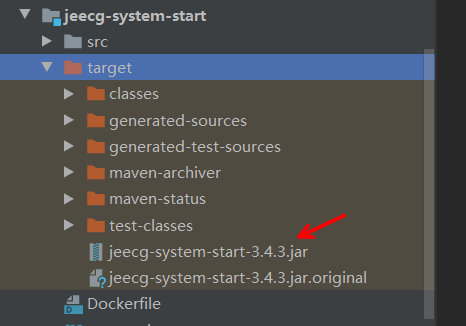
6.上传jar包到linux中,通过JAR方式启动后台
Window启动命令:
java -jar jeecg-system-start-3.4.3.jar

Linux下后台进程启动命令:
nohup java -jar jeecg-system-start-3.4.3.jar >catalina.out 2>&1 &

关掉项目:
ps -ef|grep java
kill 进程号
Nginx配置
前端nginx配置
nginx监听:80端口
绑定域名(示例):boot.jeecg.com
server {
        listen       80;
        server_name  前端访问域名;
        #解决Router(mode: 'history')模式下,刷新路由地址不能找到页面的问题
        location / {
            root   html;
            index  index.html index.htm;
            if (!-e $request_filename) {
                rewrite ^(.*)$ /index.html?s=$1 last;
                break;
            }
        }
    }
后端nginx配置
nginx监听:80端口
绑定域名(示例):api.boot.jeecg.com
    upstream api.boot.jeecg.com {
      server 127.0.0.1:8080;
     }

    server {
        listen       80;
        server_name  api.boot.jeecg.com;
        location / {
            root   html;
            index  index.html index.htm;
            proxy_pass  http://api.boot.jeecg.com;

            #ip remote_addr
            proxy_set_header X-Forwarded-Scheme  $scheme;
            proxy_redirect    off;
            proxy_set_header  Host             $host;
            proxy_set_header  X-Real-IP        $remote_addr;
            proxy_set_header  X-Forwarded-For  $proxy_add_x_forwarded_for;
        }
    }
实例