分类 WPF 下的文章

<CheckBox Width="90" Content="比例缩放" VerticalAlignment="Center" VerticalContentAlignment="Center" IsChecked="{Binding IsProportional}" Cursor="Hand" Padding="0 0 0 0">
                                <CheckBox.Style>
                                    <Style TargetType="CheckBox">
                                        <Style.Triggers>
                                            <DataTrigger Binding="{Binding StampFilePath}" Value="{x:Null}">
                                                <Setter Property="IsEnabled" Value="False"/>
                                            </DataTrigger>
                                            <DataTrigger Binding="{Binding StampFilePath}" Value="">
                                                <Setter Property="IsEnabled" Value="False"/>
                                            </DataTrigger>
                                        </Style.Triggers>
                                    </Style>
                                </CheckBox.Style>
                            </CheckBox>

如果非圆形图像,旋转的时候需要计算旋转后的画布尺寸,不然的话会导致旋转后显示的图像不全,最后将将图像绘制在新的中心位置。

// 修改图片大小、旋转角度、透明度 (印章)(预览)
        public static BitmapSource ModifyImage(string imagePath, double newWidth, double newHeight, double rotationAngle, double stampTransparency)
        {
            // 加载图像
            BitmapImage bitmap = new BitmapImage(new Uri(imagePath));

            // 调整图像尺寸
            TransformedBitmap resizedBitmap = new TransformedBitmap(bitmap, new ScaleTransform(newWidth / bitmap.PixelWidth, newHeight / bitmap.PixelHeight));

            // 计算旋转后的画布尺寸
            double radians = rotationAngle * Math.PI / 180;
            double sin = Math.Abs(Math.Sin(radians));
            double cos = Math.Abs(Math.Cos(radians));

            double rotatedWidth = resizedBitmap.PixelWidth * cos + resizedBitmap.PixelHeight * sin;
            double rotatedHeight = resizedBitmap.PixelWidth * sin + resizedBitmap.PixelHeight * cos;

            // 创建一个新的 DrawingVisual
            DrawingVisual drawingVisual = new DrawingVisual();
            using (DrawingContext drawingContext = drawingVisual.RenderOpen())
            {
                // 计算新的中心点
                double centerX = rotatedWidth / 2;
                double centerY = rotatedHeight / 2;

                // 创建旋转变换
                RotateTransform rotateTransform = new RotateTransform(rotationAngle, centerX, centerY);

                // 设置透明度
                drawingContext.PushOpacity(stampTransparency);

                // 应用旋转并绘制图像
                drawingContext.PushTransform(rotateTransform);

                // 将图像绘制在新的中心位置
                drawingContext.DrawImage(resizedBitmap, new Rect((rotatedWidth - resizedBitmap.PixelWidth) / 2, (rotatedHeight - resizedBitmap.PixelHeight) / 2, resizedBitmap.PixelWidth, resizedBitmap.PixelHeight));

                // 弹出变换和透明度设置
                drawingContext.Pop();
                drawingContext.Pop();
            }

            // 将Visual渲染为BitmapSource,使用旋转后的画布尺寸
            RenderTargetBitmap renderTargetBitmap = new RenderTargetBitmap((int)Math.Ceiling(rotatedWidth), (int)Math.Ceiling(rotatedHeight), bitmap.DpiX, bitmap.DpiY, PixelFormats.Pbgra32);
            renderTargetBitmap.Render(drawingVisual);

            return renderTargetBitmap;
        }

        // 修改图片旋转角度、透明度(印章)(PDF)
        public static BitmapSource ModifyImage(string imagePath, double rotationAngle, double stampTransparency)
        {
            // 加载图像
            BitmapImage bitmap = new BitmapImage(new Uri(imagePath));

            // 计算旋转后的画布尺寸
            double radians = rotationAngle * Math.PI / 180;
            double sin = Math.Abs(Math.Sin(radians));
            double cos = Math.Abs(Math.Cos(radians));

            double newWidth = bitmap.PixelWidth * cos + bitmap.PixelHeight * sin;
            double newHeight = bitmap.PixelWidth * sin + bitmap.PixelHeight * cos;

            // 创建一个新的 DrawingVisual
            DrawingVisual drawingVisual = new DrawingVisual();
            using (DrawingContext drawingContext = drawingVisual.RenderOpen())
            {
                // 计算新的中心点
                double centerX = newWidth / 2;
                double centerY = newHeight / 2;

                // 创建旋转变换
                RotateTransform rotateTransform = new RotateTransform(rotationAngle, centerX, centerY);

                // 设置透明度
                drawingContext.PushOpacity(stampTransparency);

                // 应用旋转并绘制图像
                drawingContext.PushTransform(rotateTransform);

                // 将图像绘制在新的中心位置
                drawingContext.DrawImage(bitmap, new Rect((newWidth - bitmap.PixelWidth) / 2, (newHeight - bitmap.PixelHeight) / 2, bitmap.PixelWidth, bitmap.PixelHeight));

                // 弹出变换和透明度设置
                drawingContext.Pop();
                drawingContext.Pop();
            }

            // 将Visual渲染为BitmapSource
            RenderTargetBitmap renderTargetBitmap = new RenderTargetBitmap((int)Math.Ceiling(newWidth), (int)Math.Ceiling(newHeight), bitmap.DpiX, bitmap.DpiY, PixelFormats.Pbgra32);
            renderTargetBitmap.Render(drawingVisual);

            return renderTargetBitmap;
        }

1.使用 TransformedBitmap 类(System.Windows.Media.Imaging)可以对图片进行缩放操作。

var originalBitmap = new BitmapImage(new Uri("yourImagePath"));

// 缩放图片
var scaleTransform = new ScaleTransform(0.5, 0.5); // 缩放比例:50%
var scaledBitmap = new TransformedBitmap(originalBitmap, scaleTransform);

// 旋转图片
var rotateTransform = new RotateTransform(45); // 旋转45度
var transformedBitmap = new TransformedBitmap(scaledBitmap, rotateTransform);

// 设置图片源
imageControl.Source = transformedBitmap;

// 设置透明度
imageControl.Opacity = 0.5; // 透明度设置为50%

2.System.Drawing (GDI+)

public static Bitmap ModifyImage(string imagePath, double newWidth, double newHeight, double rotationAngle, double stampTransparency, bool isCircle)
{
    // 加载图像
    Bitmap image = new Bitmap(imagePath);

    // 修改图像大小
    Bitmap resizedImage = new Bitmap((int)Math.Round(newWidth), (int)Math.Round(newHeight));

    using (Graphics g = Graphics.FromImage(resizedImage))
    {
        // 设置高质量插值法和抗锯齿模式
        g.InterpolationMode = InterpolationMode.HighQualityBicubic;
        g.SmoothingMode = SmoothingMode.AntiAlias;
        g.PixelOffsetMode = PixelOffsetMode.HighQuality;

        // 绘制缩放后的图像
        g.DrawImage(image, 0, 0, resizedImage.Width, resizedImage.Height);
    }

    Bitmap finalImage;

    // 仅保留圆形处理的代码
    if (isCircle)
    {
        finalImage = new Bitmap(resizedImage.Width, resizedImage.Height, PixelFormat.Format32bppArgb);

        using (Graphics g = Graphics.FromImage(finalImage))
        {
            // 清除背景(透明)
            g.Clear(Color.Transparent);

            // 设置旋转中心为图像的中心
            g.TranslateTransform((float)resizedImage.Width / 2, (float)resizedImage.Height / 2);

            // 旋转图像
            g.RotateTransform((float)-rotationAngle);

            // 重置变换矩阵回原点
            g.TranslateTransform(-(float)resizedImage.Width / 2, -(float)resizedImage.Height / 2);

            // 绘制图像
            g.DrawImage(resizedImage, new Point(0, 0));
        }
    }

    // 设置透明度
    if (stampTransparency >= 0)
    {
        // 创建一个新的位图,用于保存透明度应用后的图像
        Bitmap transparentImage = new Bitmap(finalImage.Width, finalImage.Height, PixelFormat.Format32bppArgb);

        using (Graphics g = Graphics.FromImage(transparentImage))
        {
            // 使用颜色矩阵应用透明度
            ColorMatrix colorMatrix = new ColorMatrix
            {
                Matrix33 = (float)(stampTransparency / 100.0f) // 设置Alpha值
            };
            ImageAttributes attributes = new ImageAttributes();
            attributes.SetColorMatrix(colorMatrix, ColorMatrixFlag.Default, ColorAdjustType.Bitmap);

            // 绘制图像,并应用透明度
            g.DrawImage(finalImage, new Rectangle(0, 0, finalImage.Width, finalImage.Height),
                        0, 0, finalImage.Width, finalImage.Height, GraphicsUnit.Pixel, attributes);
        }

        finalImage.Dispose(); // 释放旧的图像资源
        finalImage = transparentImage; // 用透明度应用后的图像替换
    }

    return finalImage;
}
            <Button Width="104.5" Command="{Binding StartCommand}" Content="开始" Margin="0,0,1,0" Foreground="White" Cursor="Hand">
                <Button.Template>
                    <ControlTemplate TargetType="Button">
                        <Border Background="#326CF3" CornerRadius="5,0,0,5">
                            <ContentPresenter HorizontalAlignment="Center" VerticalAlignment="Center" />
                        </Border>
                    </ControlTemplate>
                </Button.Template>
            </Button>
            <Button Width="104.5" Command="{Binding ClearVideoDataListCommand}" Content="清空" Margin="0,0,0,0" Foreground="White" Cursor="Hand">
                <Button.Template>
                    <ControlTemplate TargetType="Button">
                        <Border Background="#326CF3" CornerRadius="0,5,5,0">
                            <ContentPresenter HorizontalAlignment="Center" VerticalAlignment="Center" />
                        </Border>
                    </ControlTemplate>
                </Button.Template>
            </Button>

NuGet添加库引用: 确保项目中已经添加了 System.Windows.Interactivity 和 MvvmLightLibs

xmlns:i="http://schemas.microsoft.com/expression/2010/interactivity"

xmlns:command="http://www.galasoft.ch/mvvmlight"

AllowDrop="True"

<!-- 拖拽识别区域 -->
    <i:Interaction.Triggers>
        <i:EventTrigger EventName="DragEnter">
            <command:EventToCommand Command="{Binding DragEnterAndOverCommand}" 
            PassEventArgsToCommand="True"/>
        </i:EventTrigger>
        <i:EventTrigger EventName="DragOver">
            <command:EventToCommand Command="{Binding DragEnterAndOverCommand}" 
            PassEventArgsToCommand="True"/>
        </i:EventTrigger>
        <i:EventTrigger EventName="Drop">
            <command:EventToCommand Command="{Binding DropCommand}" PassEventArgsToCommand="True"/>
        </i:EventTrigger>
        <i:EventTrigger EventName="DragLeave">
            <command:EventToCommand Command="{Binding DragLeaveCommand}" PassEventArgsToCommand="True"/>
        </i:EventTrigger>
    </i:Interaction.Triggers>

        <!-- 透明遮罩层 -->
        <Border Grid.ColumnSpan="2" Background="#80808080" Visibility="{Binding IsImport}"/>

    // 是否正在拖放图片
    private string _isImport = "Collapsed";
    public string IsImport
    {
        get => _isImport;
        set => Set(ref _isImport, value, nameof(IsImport));
    }

        public RelayCommand<DragEventArgs> DragEnterAndOverCommand { get; private set; }
        public RelayCommand<DragEventArgs> DropCommand { get; private set; }
        public RelayCommand<DragEventArgs> DragLeaveCommand { get; private set; }

        // 拖拽进入、移动
        DragEnterAndOverCommand = new RelayCommand<DragEventArgs>(DragEnterAndOver);
        // 拖拽放入
        DropCommand = new RelayCommand<DragEventArgs>(Drop);
        // 拖拽离开
        DragLeaveCommand = new RelayCommand<DragEventArgs>(DragLeave);


        // 拖拽进入、移动
        private void DragEnterAndOver(DragEventArgs e)
        {
            // 检查拖入的数据是否为文件类型
            if (e.Data.GetDataPresent(DataFormats.FileDrop))
            {
                IsImport = "Visible";
                e.Effects = DragDropEffects.Copy; // 显示复制的鼠标样式
            }
            else
            {
                IsImport = "Collapsed";
                e.Effects = DragDropEffects.None; // 显示禁止的鼠标样式
            }

            e.Handled = true;
        }

        // 拖拽放入
        private void Drop(DragEventArgs e)
        {
            if (e.Data.GetDataPresent(DataFormats.FileDrop))
            {
                try
                {
                    // 获取拖放的所有文件路径
                    string[] selectFiles = (string[])e.Data.GetData(DataFormats.FileDrop);

                    // 定义支持的文件扩展名列表
                    string[] extensions = new string[] { ".jpg", ".jpeg", ".png", ".gif", ".bmp", ".tiff", ".webp", ".ico" };

                    List<string> imageFiles = new List<string>();
                    HashSet<string> existingFiles = new HashSet<string>(ImagePaths);

                    // 遍历所有拖放的文件和文件夹
                    foreach (var path in selectFiles)
                    {
                        if (Directory.Exists(path))
                        {
                            // 如果是文件夹,递归获取所有图片文件
                            Stack<string> dirs = new Stack<string>(new string[] { path });

                            while (dirs.Count > 0)
                            {
                                string currentDir = dirs.Pop();
                                try
                                {
                                    foreach (var file in Directory.GetFiles(currentDir))
                                    {
                                        if (extensions.Contains(Path.GetExtension(file).ToLower()) && !existingFiles.Contains(file))
                                        {
                                            imageFiles.Add(file);
                                            existingFiles.Add(file);
                                        }
                                    }

                                    foreach (var subDir in Directory.GetDirectories(currentDir))
                                    {
                                        dirs.Push(subDir);
                                    }
                                }
                                catch (Exception ex)
                                {
                                    // 处理文件夹读取异常
                                    HandyControl.Controls.MessageBox.Show($"读取文件夹时出现错误:{ex.Message}", "错误", MessageBoxButton.OK, MessageBoxImage.Error);
                                }
                            }
                        }
                        else if (File.Exists(path))
                        {
                            // 如果是文件,检查扩展名并添加到图片列表中
                            if (extensions.Contains(Path.GetExtension(path).ToLower()) && !existingFiles.Contains(path))
                            {
                                imageFiles.Add(path);
                                existingFiles.Add(path);
                            }
                        }
                    }

                    if (SequentialTypesetting)
                    {
                        // 添加符合扩展名的文件到 ImagePaths 列表中
                        foreach (var file in imageFiles)
                        {
                            ImagePaths.Add(file);
                        }
                    }
                    else if (RandomTypesetting)
                    {
                        // 创建Random实例
                        var random = new Random();

                        // 打乱文件列表
                        var shuffledFiles = imageFiles.OrderBy(x => random.Next()).ToList();

                        // 将列表分割为两部分
                        int middle = shuffledFiles.Count / 2;
                        var firstHalf = shuffledFiles.Take(middle).ToList();
                        var secondHalf = shuffledFiles.Skip(middle).ToList();

                        // 交错合并两个列表
                        var mixedFiles = new List<string>();
                        int maxLength = Math.Max(firstHalf.Count, secondHalf.Count);
                        for (int i = 0; i < maxLength; i++)
                        {
                            if (i < secondHalf.Count)
                                mixedFiles.Add(secondHalf[i]);
                            if (i < firstHalf.Count)
                                mixedFiles.Add(firstHalf[i]);
                        }

                        // 保存文件路径
                        foreach (var file in mixedFiles)
                        {
                            ImagePaths.Add(file);
                        }
                    }

                    // 标记事件已处理
                    e.Handled = true;

                    // 导入图片数量
                    ImportedImagesCount = ImagePaths.Count;

                    if (StitchableImagesCount == 0 || StitchAfterNImages == 0)
                    {
                        // 拼接图片数量
                        StitchableImagesCount = 1;
                    }
                    else
                    {
                        // 可拼接图片数量
                        StitchableImagesCount = (int)Math.Ceiling((double)ImportedImagesCount / StitchAfterNImages);
                    }
                    // 显示返回按钮
                    BackVisible = "Visible";

                    // 检查是否有图片文件
                    if (ImagePaths.Any())
                    {
                        IsEnableParameter = true;

                        IsImageWatermarkSelected = false;
                        IsTextWatermarkSelected = false;

                        WatermarkImagePath = "";
                        WatermarkImageWidth = 0;
                        WatermarkImageHeight = 0;

                        WatermarkText = "";
                        FontType = "微软雅黑";
                        FontSize = 30;
                        TextColor = "#FFFFFF";

                        WatermarkRotationAngle = 0;
                        WatermarkOpacity = 100;
                        WatermarkPosition = "右下";
                        WatermarkSpacing = 200;

                        Preview();
                    }
                    else
                    {
                        IsEnableParameter = false;
                        HandyControl.Controls.MessageBox.Show("所选文件夹中没有找到任何图片文件!", "提示", MessageBoxButton.OK, MessageBoxImage.Warning);
                        SelectedFolderPath = string.Empty;
                    }
                }
                catch (Exception ex)
                {
                    IsEnableParameter = false;
                    HandyControl.Controls.MessageBox.Show($"加载图片路径时出现错误:{ex.Message}", "错误", MessageBoxButton.OK, MessageBoxImage.Error);
                    // 标记事件已处理
                    e.Handled = true;
                }
                finally
                {
                    IsImport = "Collapsed";
                }
            }
        }

        // 拖拽离开
        private void DragLeave(DragEventArgs e)
        {
            IsImport = "Collapsed";
            e.Handled = true;
        }

<TextBox Text="{Binding SaveHeight, UpdateSourceTrigger=PropertyChanged}" 
         Width="70" 
         Grid.Column="1" 
         Margin="5 0 0 0" 
         Style="{StaticResource TextBoxExtend}" />

1.创建 ViewModelLocator 类
右键点击 ViewModel 文件夹,选择 添加 > 类,命名为 ViewModelLocator.cs。
在 ViewModelLocator.cs 文件中,添加以下代码:

using CommonServiceLocator;
using GalaSoft.MvvmLight.Ioc;

namespace VideoWatermark_Premium.ViewModel
{
    public class ViewModelLocator
    {
        public ViewModelLocator()
        {
            ServiceLocator.SetLocatorProvider(() => SimpleIoc.Default);

            // Register ViewModels
            SimpleIoc.Default.Register<MainWindowViewModel>();
        }

        public MainWindowViewModel MainWindowViewModel
        {
            get { return ServiceLocator.Current.GetInstance<MainWindowViewModel>(); }
        }

        public static void Cleanup()
        {
            // TODO Clear the ViewModels
        }
    }
}

2.修改 App.xaml 文件
打开 App.xaml 文件。
修改 App.xaml 文件,添加 ViewModelLocator 资源:

<Application x:Class="VideoWatermark_Premium.App"
             xmlns="http://schemas.microsoft.com/winfx/2006/xaml/presentation"
             xmlns:x="http://schemas.microsoft.com/winfx/2006/xaml"
             xmlns:vm="clr-namespace:VideoWatermark_Premium.ViewModel"
             StartupUri="MainWindow.xaml">
    <Application.Resources>
        <ResourceDictionary>
            <ResourceDictionary.MergedDictionaries>
                <!-- HandyControl 主题-->
                <ResourceDictionary Source="pack://application:,,,/HandyControl;component/Themes/SkinDefault.xaml"/>
                <ResourceDictionary Source="pack://application:,,,/HandyControl;component/Themes/Theme.xaml"/>
            </ResourceDictionary.MergedDictionaries>
            <!-- ViewModelLocator -->
            <vm:ViewModelLocator x:Key="Locator" />
        </ResourceDictionary>
    </Application.Resources>
</Application>

3.设置 MainWindow 的 DataContext
打开 MainWindow.xaml 文件。
设置 DataContext,使其绑定到 ViewModelLocator 的 MainWindowViewModel 属性:

<Window x:Class="VideoWatermark_Premium.MainWindow"
        xmlns="http://schemas.microsoft.com/winfx/2006/xaml/presentation"
        xmlns:x="http://schemas.microsoft.com/winfx/2006/xaml"
        DataContext="{Binding Source={StaticResource Locator}, Path=MainWindowViewModel}"
        Title="MainWindow" Height="350" Width="525">
    <Grid>
        <TextBlock Text="{Binding WelcomeMessage}" VerticalAlignment="Center" HorizontalAlignment="Center" FontSize="24"/>
    </Grid>
</Window>

选择一个或者多个文件文件:Microsoft.WindowsAPICodePack.Dialogs.CommonOpenFileDialog
选择文件夹:Microsoft.WindowsAPICodePack.Dialogs.CommonOpenFileDialog
保存文件夹:Microsoft.WindowsAPICodePack.Dialogs.CommonSaveFileDialog

NuGet 包管理器安装安装 WindowsAPICodePack-Shell

选择一个或者多个文件: OpenFileDialog
保存文件夹:SaveFileDialog

Microsoft.Win32

选择一个或者多个文件:OpenFileDialog
选择文件夹:FolderBrowserDialog
保存文件夹:SaveFileDialog

System.Windows.Forms

参考教程:
1.https://www.cnblogs.com/manupstairs/p/4890300.html
2.https://www.cnblogs.com/manupstairs/p/4909585.html
3.https://www.cnblogs.com/manupstairs/p/4928888.html
4.https://www.cnblogs.com/manupstairs/p/4948347.html
5.https://www.cnblogs.com/manupstairs/p/13661227.html

-----适合小型项目,简化版结构,不使用Locator,直接在XAML中设置DataContext
1.创建 WPF 项目
打开 Visual Studio 并创建一个新的 WPF 应用项目。

2.安装 MVVM Light
在解决方案资源管理器中,右击项目名称,选择“管理 NuGet 包”。
在 NuGet 包管理器中搜索 MvvmLightLibs 并安装该包。

3.创建 ViewModel
在项目中添加一个新的类文件,命名为 MainViewModel.cs。
让这个类继承自 ViewModelBase 类,添加一个属性用于数据绑定、添加一个Command命令:

using GalaSoft.MvvmLight;

public class MainViewModel : ViewModelBase
{
    public MainViewModel()
    {
        UpdateMessageCommand = new RelayCommand(UpdateMessage);
    }

    private string _welcomeMessage = "Hello, MVVM Light!";

    public string WelcomeMessage
    {
        get => _welcomeMessage;
        set => Set(ref _welcomeMessage, value, , nameof(WelcomeMessage));
        //在使用 MVVMLight 框架时,通常不需要直接调用 RaisePropertyChanged 方法,因为 MVVMLight 的 
          ViewModelBase 类已经为您处理了属性更改通知。您只需要在属性的 setter 方法中使用 Set 方法,并传入属性字段 
          的引用和新值,Set 方法会自动触发属性更改通知。
    }

    public RelayCommand UpdateMessageCommand { get; }
    private void UpdateMessage()
    {
        WelcomeMessage = "Message updated!";
    }
}

4.设置 DataContext
修改 MainWindow.xaml 的 XAML 代码,以将 DataContext 设置为 MainViewModel 的实例(非共享,每个独立,可以使用Locator共享MainViewModel):

<Window x:Class="YourNamespace.MainWindow"
        xmlns="http://schemas.microsoft.com/winfx/2006/xaml/presentation"
        xmlns:x="http://schemas.microsoft.com/winfx/2006/xaml"
        xmlns:local="clr-namespace:YourNamespace"
        xmlns:vm="clr-namespace:PictureStitching.ViewModel" <!-- 添加这个,如果ViewModel在子命名空间下 -->
        Title="MainWindow" Height="350" Width="525">
    <Window.DataContext>
        <vm:MainViewModel />
    </Window.DataContext>
    <Grid>
        <TextBlock Text="{Binding WelcomeMessage}" />
        <Button Content="Update Message" Command="{Binding UpdateMessageCommand}" />
    </Grid>
</Window>

在Visual Studio中设计WPF应用时,窗口大小包括边框和标题栏,这确实可能导致设计时和运行时窗口大小的差异。要解决这个问题,可以采用以下方法:
---使用SizeToContent属性:
设置Window窗口的SizeToContent属性为:SizeToContent="WidthAndHeight"
这样窗口会自动调整自己的大小以刚好容纳其内容。
这种方法确保了设计时内容区的大小和运行时一致,但可能会限制对窗口大小的手动控制。

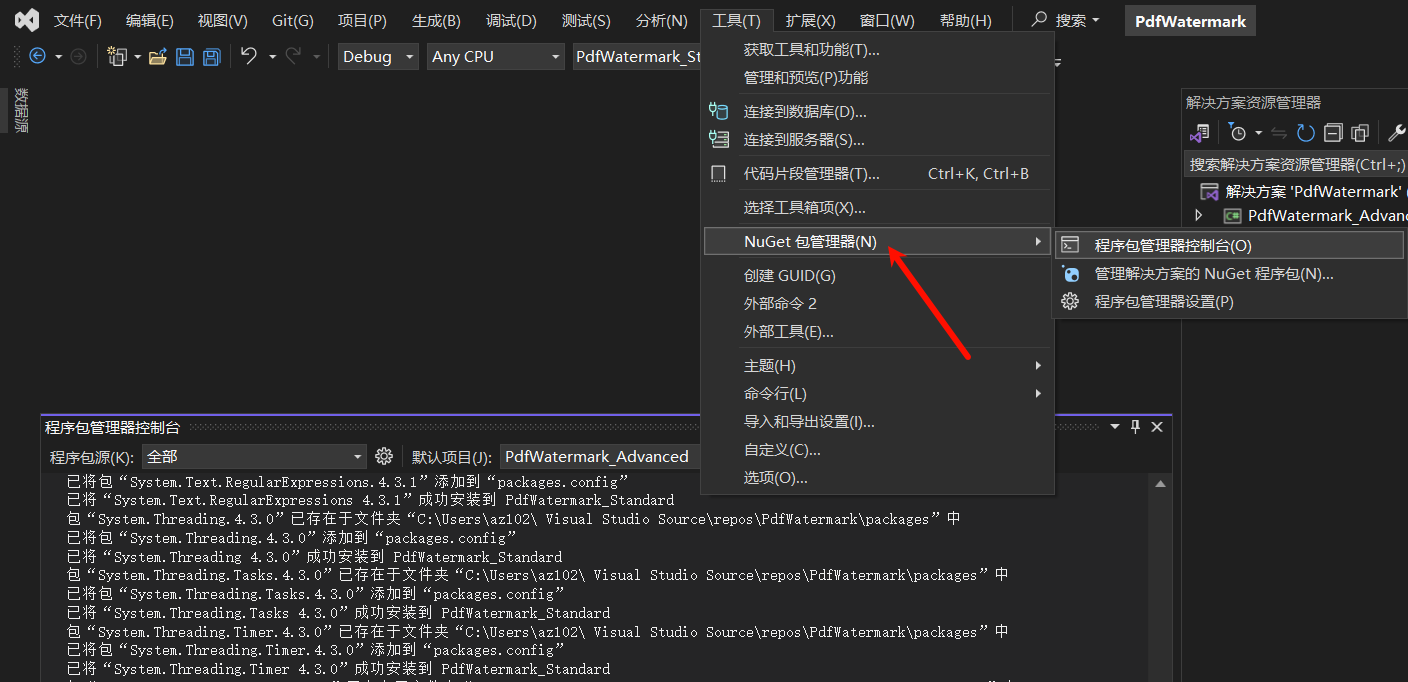
你提到的方法是在新项目中重复利用现有项目的包依赖,是一种有效的方法。以下是详细步骤:

1.将项目的packages.config文件拷贝到新项目中。这个文件通常位于项目根目录下,用于指定项目所依赖的NuGet包及其版本信息。
2.打开NuGet Package Manager控制台。
PixPin_2024-03-07_02-13-59.png
在Visual Studio中,你可以通过依次选择“Tools” -> “NuGet Package Manager” -> “Package Manager Console” 打开NuGet Package Manager控制台。
4.使用命令还原包,重新下载。
在NuGet Package Manager控制台中,输入以下命令:

Update-Package -ProjectName 'YourProjectName' -Reinstall

在这个命令中,将YourProjectName替换为你要操作的项目的名称。

通过这些步骤,你就可以将现有项目中的包依赖复制到新项目中,并确保它们被正确安装和引用。

<?xml version="1.0" encoding="utf-8" ?>
<Weavers xmlns:xsi="http://www.w3.org/2001/XMLSchema-instance" xsi:noNamespaceSchemaLocation="FodyWeavers.xsd">
  <Costura />
</Weavers>
<?xml version="1.0" encoding="utf-8" ?>
<Weavers xmlns:xsi="http://www.w3.org/2001/XMLSchema-instance" xsi:noNamespaceSchemaLocation="FodyWeavers.xsd">
    <Costura>
        <ExcludeAssemblies>
            PdfiumViewer
        </ExcludeAssemblies>
    </Costura>
</Weavers>

让 Costura 排除 PdfiumViewer.dll, 标签下应该只有程序集的名称,而不是文件路径,而且不需要文件扩展名 .dll
教程:https://blog.csdn.net/wangjiaoshoudebaba/article/details/80787677

使用 DataTrigger 可以使你在 XAML 中根据数据绑定的值来动态地改变控件的外观或行为。这在创建交互式用户界面时非常有用,例如根据用户的输入来修改控件的样式或显示不同的内容。

  1. 创建Model(模型)
    首先定义一个LoginModel模型来表示登录信息。

    namespace Login.Model
    {
     public class LoginModel
     {
         public string Username { get; set; }
         public string Password { get; set; }
     }
    }
  2. 创建ViewModel(视图模型)
    ViewModel作为View和Model之间的桥梁,包含用户输入的数据和命令绑定。

    using System;
    using System.ComponentModel;
    using System.Windows.Input;
    using Login.Command;
    using Login.Model;
    
    namespace Login.ViewModel
    {
     public class LoginViewModel : INotifyPropertyChanged
     {
    
         private LoginModel loginModel;
    
         public String Username
         {
             get { return loginModel.Username; }
             set
             { 
                 this.loginModel.Username = value;
                 OnPropertyChanged(nameof(Username));
             }
         }
    
         public String Password
         { 
             get { return loginModel.Password; }
             set
             { 
                 this.loginModel.Password = value;
                 OnPropertyChanged("Password");
             }
         }
    
         public ICommand LoginCommand { get; private set; }
    
         public LoginViewModel()
         {
             loginModel = new LoginModel();
             LoginCommand = new RelayCommand(Login, CanLogin);
         }
    
         private void Login(object parameter)
         {
             // 在这里添加登入逻辑
             if (CanLogin(null))
             {
                 Console.WriteLine($"登录成功:用户名={Username}, 密码={Password}");
             }
         }
    
         private bool CanLogin(object parameter)
         {
             // 在这里添加验证逻辑
             return !string.IsNullOrEmpty(Username) && !string.IsNullOrEmpty(Password);
         }
    
         public event PropertyChangedEventHandler PropertyChanged;
         protected virtual void OnPropertyChanged(string propertyName)
         {
             PropertyChanged?.Invoke(this, new PropertyChangedEventArgs(propertyName));
         }
     }
    }
  3. 创建View(视图)
    接下来创建XAML界面用于用户输入和触发登录命令。

    <Window x:Class="Login.MainWindow"
         xmlns="http://schemas.microsoft.com/winfx/2006/xaml/presentation"
         xmlns:x="http://schemas.microsoft.com/winfx/2006/xaml"
         xmlns:d="http://schemas.microsoft.com/expression/blend/2008"
         xmlns:mc="http://schemas.openxmlformats.org/markup-compatibility/2006"
         xmlns:local="clr-namespace:Login"
         mc:Ignorable="d"
         Title="MainWindow" Height="450" Width="800">
     <Grid>
         <StackPanel Margin="20">
             <Label Content="Username:"/>
             <TextBox Text="{Binding Username, UpdateSourceTrigger=PropertyChanged}" Margin="0,5"/>
             <Label Content="Password:"/>
             <TextBox Text="{Binding Password, UpdateSourceTrigger=PropertyChanged}" Margin="0,5"/>
             <Button Content="Login" Command="{Binding LoginCommand}" Width="100" Height="30" Margin="0,15"/>
         </StackPanel>
     </Grid>
    </Window>

    4.创建RelayCommand
    RelayCommand是一个实现了ICommand接口的类,用于绑定View中的命令到ViewModel的命令处理方法

    using System;
    using System.Windows.Input;
    
    namespace Login.Command
    {
     public class RelayCommand : ICommand
     {
         private readonly Action<object> _execute;
         private readonly Func<object, bool> _canExecute;
    
         public RelayCommand(Action<object> execute, Func<object, bool> canExecute = null)
         {
             _execute = execute ?? throw new ArgumentNullException(nameof(execute));
             _canExecute = canExecute;
         }
    
         public event EventHandler CanExecuteChanged
         {
             add { CommandManager.RequerySuggested += value; }
             remove { CommandManager.RequerySuggested -= value; }
         }
    
         public bool CanExecute(object parameter)
         {
             return _canExecute == null || _canExecute(parameter);
         }
    
         public void Execute(object parameter)
         {
             _execute(parameter);
         }
     }
    }

    5.绑定DataContext
    建立视图(UI)与视图模型(ViewModel)之间的数据绑定关系

    using System.Windows.Data;
    using Login.ViewModel;
    
    namespace Login
    {
     /// <summary>
     /// MainWindow.xaml 的交互逻辑
     /// </summary>
     public partial class MainWindow : Window
     {
         public MainWindow()
         {
             InitializeComponent();
             DataContext = new LoginViewModel();
         }
     }
    }

  1. 安装AutoUpdater.NET:打开你的WPF项目,然后使用NuGet包管理器来安装AutoUpdater.NET。
  2. 配置更新过程
    a. 在你的WPF应用程序中找到主窗体的代码文件。
    b. 引入AutoUpdater.NET命名空间:

    using AutoUpdaterDotNET;

    c. 在主窗体的Loaded事件中配置AutoUpdater:

    • 以下是在主窗体的Loaded事件中启动自动更新的示例:

      /**
          * 配置 AutoUpdater.NET 检查更新参数
          */
         private async void MainWindow_Loaded(object sender, RoutedEventArgs e)
         {
             try
             {
                 await Task.Delay(300);
      
                 if (GlobalConfig.SoftwareVersionId <= 0)
                 {
                     return;
                 }
      
                 /** 设置图标,将 System.Drawing.Icon 对象转换为 System.Drawing.Bitmap 对象 */
                 AutoUpdater.UpdateFormSize = new System.Drawing.Size(800, 500);
                 try
                 {
                     AutoUpdater.Icon = Properties.Resources.Icon.ToBitmap();
                 }
                 catch
                 {
                     /** 资源缺失不致命,保持默认图标即可,不阻断更新检查 */
                 }
      
                 /** 从配置文件读取更新URL */
                 string updateUrl = $"{GlobalConfig.ServerUrl}/api/client/update/xml/{GlobalConfig.SoftwareVersionId}";
                 AutoUpdater.Start(updateUrl);
             }
             catch
             {
                 /** async void 顶层兜底:避免 AutoUpdater / 资源加载异常被 Dispatcher.UnhandledException 上抛终结进程 */
             }
         }
    • 确保将URL替换为指向你的更新XML文件的真实URL。
  3. 服务器配置 XML 文件

    <?xml version="1.0" encoding="UTF-8"?>
    <item>
      <version>1.1.0.0</version>
      <url>https://update.codespool.com/VideoWatermark/AutoUpdaterTest.zip</url>
      <changelog>https://update.codespool.com/VideoWatermark/release.html</changelog>
      <mandatory>false</mandatory>
    </item>
  4. 服务器配置 changelog文件

    <!DOCTYPE html>
    <html lang="en">
    <head>
     <meta charset="UTF-8">
     <meta name="viewport" content="width=device-width, initial-scale=1.0">
     <title>软件更新日志</title>
     <style>
         body {
             font-family: Arial, sans-serif;
             line-height: 1.6;
             padding: 20px;
         }
         h1 {
             text-align: center;
         }
         h2 {
             margin-top: 30px;
         }
         ul {
             margin-left: 20px;
         }
     </style>
    </head>
    <body>
     <h1>软件更新日志</h1>
     
     <h2>版本 1.0.0</h2>
     <ul>
         <li>新增功能:用户登录</li>
         <li>新增功能:创建和编辑个人资料</li>
         <li>新增功能:查看其他用户资料</li>
         <li>修复了一些已知的 bug</li>
     </ul>
    </body>
    </html>