2024年3月

参考教程:
1.https://www.cnblogs.com/manupstairs/p/4890300.html
2.https://www.cnblogs.com/manupstairs/p/4909585.html
3.https://www.cnblogs.com/manupstairs/p/4928888.html
4.https://www.cnblogs.com/manupstairs/p/4948347.html
5.https://www.cnblogs.com/manupstairs/p/13661227.html

-----适合小型项目,简化版结构,不使用Locator,直接在XAML中设置DataContext
1.创建 WPF 项目
打开 Visual Studio 并创建一个新的 WPF 应用项目。

2.安装 MVVM Light
在解决方案资源管理器中,右击项目名称,选择“管理 NuGet 包”。
在 NuGet 包管理器中搜索 MvvmLightLibs 并安装该包。

3.创建 ViewModel
在项目中添加一个新的类文件,命名为 MainViewModel.cs。
让这个类继承自 ViewModelBase 类,添加一个属性用于数据绑定、添加一个Command命令:

using GalaSoft.MvvmLight;

public class MainViewModel : ViewModelBase
{
    public MainViewModel()
    {
        UpdateMessageCommand = new RelayCommand(UpdateMessage);
    }

    private string _welcomeMessage = "Hello, MVVM Light!";

    public string WelcomeMessage
    {
        get => _welcomeMessage;
        set => Set(ref _welcomeMessage, value, , nameof(WelcomeMessage));
        //在使用 MVVMLight 框架时,通常不需要直接调用 RaisePropertyChanged 方法,因为 MVVMLight 的 
          ViewModelBase 类已经为您处理了属性更改通知。您只需要在属性的 setter 方法中使用 Set 方法,并传入属性字段 
          的引用和新值,Set 方法会自动触发属性更改通知。
    }

    public RelayCommand UpdateMessageCommand { get; }
    private void UpdateMessage()
    {
        WelcomeMessage = "Message updated!";
    }
}

4.设置 DataContext
修改 MainWindow.xaml 的 XAML 代码,以将 DataContext 设置为 MainViewModel 的实例(非共享,每个独立,可以使用Locator共享MainViewModel):

<Window x:Class="YourNamespace.MainWindow"
        xmlns="http://schemas.microsoft.com/winfx/2006/xaml/presentation"
        xmlns:x="http://schemas.microsoft.com/winfx/2006/xaml"
        xmlns:local="clr-namespace:YourNamespace"
        xmlns:vm="clr-namespace:PictureStitching.ViewModel" <!-- 添加这个,如果ViewModel在子命名空间下 -->
        Title="MainWindow" Height="350" Width="525">
    <Window.DataContext>
        <vm:MainViewModel />
    </Window.DataContext>
    <Grid>
        <TextBlock Text="{Binding WelcomeMessage}" />
        <Button Content="Update Message" Command="{Binding UpdateMessageCommand}" />
    </Grid>
</Window>
在Visual Studio中设计WPF应用时,窗口大小包括边框和标题栏,这确实可能导致设计时和运行时窗口大小的差异。要解决这个问题,可以采用以下方法:
---使用SizeToContent属性:
设置Window窗口的SizeToContent属性为:SizeToContent="WidthAndHeight"
这样窗口会自动调整自己的大小以刚好容纳其内容。
这种方法确保了设计时内容区的大小和运行时一致,但可能会限制对窗口大小的手动控制。

[Parsed_movie_0 @ 000000cdff819fc0] Failed to avformat_open_input 'C'
[AVFilterGraph @ 000000cdff3c0f80] Error initializing filter 'movie' with args 'E:\image.jpg'
Error reinitializing filters!
Failed to inject frame into filter network: No such file or directory
Error while processing the decoded data for stream #0:0

路径的冒号是需要转义的,把路径的转义一下就可以了
像这样:

ffmpeg -i E:\1.mp4 -vf "movie='E\:\\icon.ico'[wm]; [in][wm]overlay=30:30[out]" E:\video\output.mp4
watermarkImage = "C:\\image\\water.png"
watermarkImage = watermarkImage.Replace("\\", @"/").Replace(":", @"\:");
// 构造 ffplay 的参数,用于预览水印效果
string ffplayArgs = $"-i \"{selectedVideo}\" -vf \"movie='{watermarkImage}' [watermark]; [in][watermark] overlay=x='if(eq(mod(floor(t),{intervalTime}), 0), clip(sin({randomLeapX}*floor(t)) * (main_w-overlay_w-1)/2 + (main_w-overlay_w)/2, 0, main_w-overlay_w), x)':y='if(eq(mod(floor(t),{intervalTime}), 0), clip(sin({randomLeapY}*floor(t)) * (main_h-overlay_h-1)/2 + (main_h-overlay_h)/2, 0, main_h-overlay_h), y)'\" -x {windowWidth} -y {windowHeight} -window_title 预览";

1.创建一个静态类,命名为 GlobalConfig。
2.在 GlobalConfig 类中定义静态只读属性或常量,用于存储你的配置信息(例如 ServerUrl、SoftwareVersion、VersionNumber、ActivationFolderName、ActivationFileName、UpdateUrl)。

public static class GlobalConfig
{
    public static readonly string ServerUrl = "你的服务器URL";
    public static readonly string SoftwareVersion = "软件版本";
    public static readonly int VersionNumber = 1; // 假设版本号是整数
    public static readonly string ActivationFolderName = "激活文件夹名称";
    public static readonly string ActivationFileName = "激活文件名称";
    public static readonly string UpdateUrl = "更新URL";
}
string serverUrl = GlobalConfig.ServerUrl;

添加对 System.Configuration 的引用:
1.如果你的项目是 .NET Framework 项目,System.Configuration 通常已经包含在框架中。但在一些情况下,你可能需要手动添加对它的引用。
2.对于 .NET Core 或 .NET 5/6 项目,ConfigurationManager 不再包含在核心框架中。你需要通过NuGet添加 System.Configuration.ConfigurationManager 包。

最后:using System.Configuration;

缺点:会和exe文件一起,输出外部配置文件

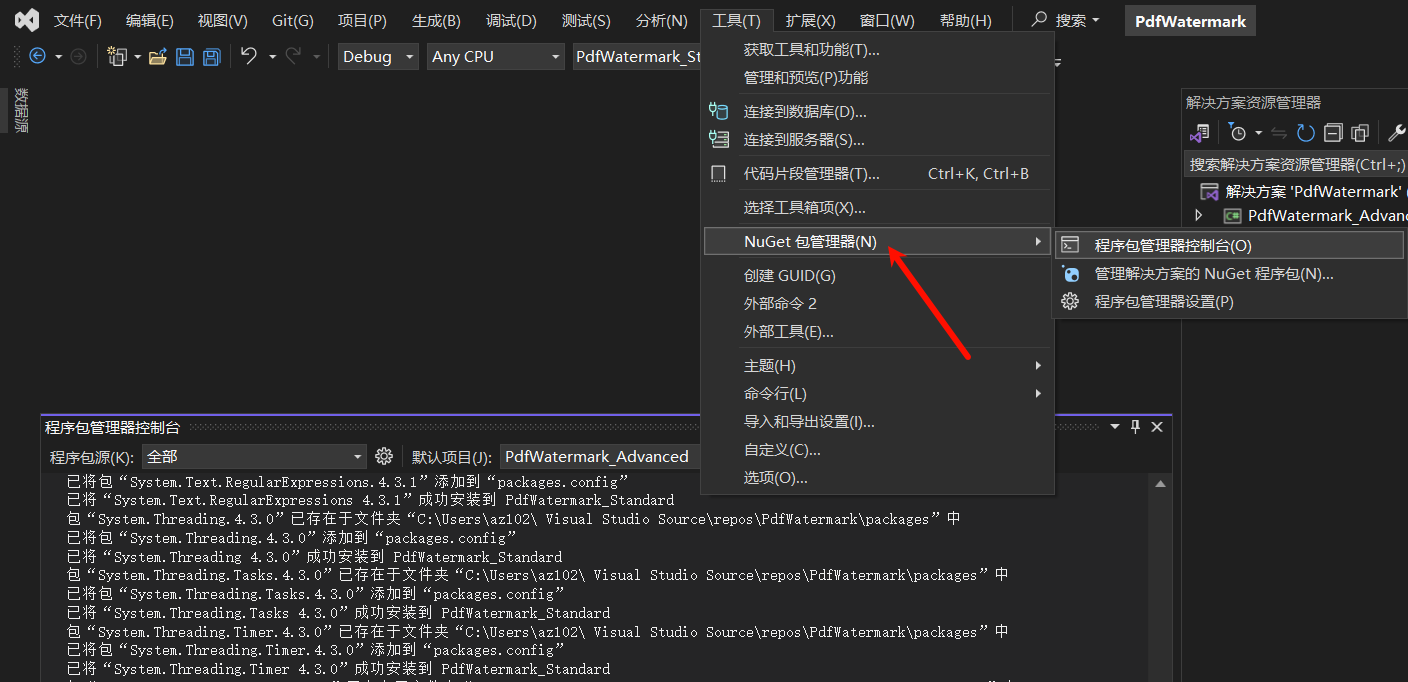
你提到的方法是在新项目中重复利用现有项目的包依赖,是一种有效的方法。以下是详细步骤:

1.将项目的packages.config文件拷贝到新项目中。这个文件通常位于项目根目录下,用于指定项目所依赖的NuGet包及其版本信息。
2.打开NuGet Package Manager控制台。
PixPin_2024-03-07_02-13-59.png
在Visual Studio中,你可以通过依次选择“Tools” -> “NuGet Package Manager” -> “Package Manager Console” 打开NuGet Package Manager控制台。
4.使用命令还原包,重新下载。
在NuGet Package Manager控制台中,输入以下命令:

Update-Package -ProjectName 'YourProjectName' -Reinstall

在这个命令中,将YourProjectName替换为你要操作的项目的名称。

通过这些步骤,你就可以将现有项目中的包依赖复制到新项目中,并确保它们被正确安装和引用。

<?xml version="1.0" encoding="utf-8" ?>
<Weavers xmlns:xsi="http://www.w3.org/2001/XMLSchema-instance" xsi:noNamespaceSchemaLocation="FodyWeavers.xsd">
  <Costura />
</Weavers>
<?xml version="1.0" encoding="utf-8" ?>
<Weavers xmlns:xsi="http://www.w3.org/2001/XMLSchema-instance" xsi:noNamespaceSchemaLocation="FodyWeavers.xsd">
    <Costura>
        <ExcludeAssemblies>
            PdfiumViewer
        </ExcludeAssemblies>
    </Costura>
</Weavers>

让 Costura 排除 PdfiumViewer.dll, 标签下应该只有程序集的名称,而不是文件路径,而且不需要文件扩展名 .dll
教程:https://blog.csdn.net/wangjiaoshoudebaba/article/details/80787677

使用 DataTrigger 可以使你在 XAML 中根据数据绑定的值来动态地改变控件的外观或行为。这在创建交互式用户界面时非常有用,例如根据用户的输入来修改控件的样式或显示不同的内容。